Welcome to Part 4 of this series! In this episode, we will complete our Really Minimal WordPress 3.5 theme by adding a Sidebar to it and, why not, a proper thumbnail image for the Themes Editor.
Ready? Set. Go!
Let’s create inside our Really Minimal theme folder and new PHP file named (surprise!) sidebar.php. For the moment we add some minimal content to it. We will revisit this later on. Here is what our minimal sidebar.php looks like.
|
1 |
<p>This is the sidebar!</p> |
Next we need some code to display our sidebar. From the previous part you already know that we need to use get_sidebar() for that to happen.
Let’s add it to index.php before the loop (as an alternative it can also go after the loop). The final layout will be controlled by CSS. Here is how the new version of index.php including the sidebar looks like.
|
1 2 3 4 5 6 7 8 9 10 11 12 13 14 15 |
<?php get_header(); get_sidebar(); if (have_posts()) : while (have_posts()) : { the_post(); the_title(); echo( ‘<br />’ ); the_content(); echo( ‘<br />’ ); } endwhile; endif; get_footer(); ?> |
Reload our site and watch how the sidebar places itself between the header and the content. This is exactly how it should be.

We could now add more content to the sidebar and make it prettier but, wait, one of the best features of WordPress is the ability to define a so called widgetized sidebars (yes, you can have more than one!) A widgetized sidebar is a dynamic sidebar that can host one or more widgets. The site administrator can use the Appearance –> Widget menu in the Dashboard to assign any of the available widgets to the sidebar, even more the one. Each widget can display different content, like the latest posts, the archive directory, text, etc. New widgets can be added by installing specific plugins. Pretty cool, isn’t it? Our Really Minimal theme has to have a widgetized sidebar! Here is how to add it.
We need to create a fifth PHP file in our theme directory called functions.php (we now have five PHP files and one CSS file). The reason we need functions.php is that in order to create a widgetized sidebar we need to call in it a special WordPress function to register it. Through the registration process, WordPress becomes aware of the existence of our sidebar and can make it available as a container for the widgets. Here is functions.php:
|
1 2 3 4 5 |
<?php if ( function_exists (‘register_sidebar’)) { register_sidebar (); } ?> |
With functions.php in place, reload your site. At this point our sidebar will still look the same because we have not yet added the code to make it dynamic. However if you visit your site’s Dashboard, you will note that the Appearance menu now contains a new entry, called Widgets. Click on Widgets and, presto, you have a new dynamic sidebar (called Sidebar1) ready to be assigned some cool widgets.

As a test, let’s drag a couple of Widgets to it, for example a Search form and a Text widget. Then save and go back to your site… Yes, it didn’t change! Remember that we still need to make our sidebar able to display its newly assigned dynamic content. To do that, let’s edit our static sidebar.php and change its content as follows:
|
1 2 3 4 5 |
<?php if ( function_exists ( dynamic_sidebar(1) ) ) : dynamic_sidebar (1); endif; ?> |
Super simple but very very powerful! Look at our blog now.
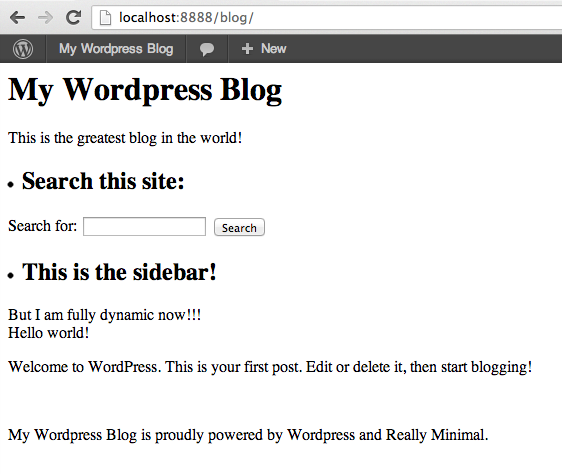
Yes, we have a fully dynamic (aka widgetized) sidebar! You can pat yourself on the shoulder.
True, we do not have any CSS defined yet, so graphically our site looks really primitive, but, hey, it has all the functionalities of a full fledged WordPress theme. (No CSS? After all there might be a Part 5 in the series, let me know through the comments if you would like one!)
Great, now we only have one thing left to finish up our theme. Let’s add a suitable screenshot to it. Here is one that properly fits in the style of our theme:

Make sure the file is named screenshot.png, place it inside our theme directory and… done! Our Really Minimal theme now has a dedicated thumbnail image inside WordPress’s theme browser.
I hope you have enjoyed this series of posts on how to create, from scratch, a Really Minimal WordPress Theme. If you would like to see more (Part 5 for CSS styling for example), let me know by leaving a comment below. Ciao!
UPDATE: this follow-up article shows how to style our Really Minimal theme using Boostrap 3.0. Enjoy!
4 responses to “A really minimal WordPress theme – Part 4”
Good job!
Please we need the part 5. I have homework to do but i’m still waiting.
Hello. I was really happy to find this very helpful tutorial. Thank you for that. I have some questions about this part 4: how can the sidebar appear in the page if there is no code to call it? / How can i add that .png image?, because the is no real explanation.
Thanks.
PS: i’m really interested in that part 5.
Hello,
thanks for pointing this out to me. You are perfectly right regarding the sidebar, I forgot to paste in the new index.php which contains get_sidebar(). This is the function that displays the sidebar by including the sidebar.php theme part. I corrected the article and added this part, please have another look.
Regarding the png file for the theme screenshot, the explanation is already the article. You simply need to place it in the main folder for your theme. It doesn’t need to be referenced anywhere as long as the filename is screenshot.png. WordPress will automatically find it and display it in the theme browser.
Hope this helps.
Cheers,
Marco.
I almost forgot, the link below is “Part 5”. It shows how to style the Really Minimal theme using Bootstrap 3.0.
http://marcoghislanzoni.com/blog/2013/10/25/adding-bootstrap-3-0-support-to-your-wordpress-theme/
Ciao,
Marco.